推荐两个Partition Magic的替代软件
可动态调整分区大小,分区,格式化什么的就更不在话下了。
PS:如果你用SSD的话,记得分区对齐。
推荐两个Partition Magic的替代软件
可动态调整分区大小,分区,格式化什么的就更不在话下了。
PS:如果你用SSD的话,记得分区对齐。
Here are steps to setup a user and allow the user access only via FTP (i.e. no SSH) and also limit access to a specific (user home) directory on proftpd:
1. Add new user: adduser newusername
2. Set password: passwd newusername
3. Modify user home directory from default to a new folder:
usermod -d /target/directory username
4. Edit shells file: vi /etc/shells and add /dev/null at the end
5. Modify newusername entry in the passwd file: vi /etc/passwd to add /./ before the newusername so that the entry looks like this:
newusername:x:502:502::/home/ftp/./newusernamehomedirectory/:/dev/null
6. Edit /etc/proftpd/proftpd.conf file and uncomment the line DefaultRoot ~
grep -rnw '/path/to/somewhere/' -e 'pattern'-r or -R is recursive,-n is line number, and-w stands for match the whole word.-l (lower-case L) can be added to just give the file name of matching files.Along with these, --exclude, --include, --exclude-dir flags could be used for efficient searching:
grep --include=\*.{c,h} -rnw '/path/to/somewhere/' -e "pattern"
grep --exclude=*.o -rnw '/path/to/somewhere/' -e "pattern"
--exclude-dirparameter. For example, this will exclude the dirs dir1/, dir2/ and all of them matching *.dst/:
grep --exclude-dir={dir1,dir2,*.dst} -rnw '/path/to/somewhere/' -e "pattern"
This works very well for me, to achieve almost the same purpose like yours.
For more options check man grep
sudo apt-get clean
sudo apt autoremove –purge
sudo apt-get autoremove –purge
sudo purge-old-kernels
sudo apt autoremove
今天刚好有这个需求研究了一下,发现ffmpeg就可以实现。
$ ffmpeg -f gif -i infile.gif outfile.mp4
Mark一下
还在用ISP给的DNS?有没发现一些网站上不去了?
试试下面几个公共DNS服务器:
首选(联通):123.125.81.6
备选(联通):140.207.198.6
如果碰上一些MP4中的音乐特别好听的,想转成MP3的话怎么办?
用ffmpeg就可以实现:
ffmpeg -i a.mp4 b.mp3
还可以加 -b:a 192k 来指定码率
更多参数可参照:https://trac.ffmpeg.org/wiki/Encode/MP3
最近在Ubuntu 16.04上实现了使用XRDP远程连接Unity桌面。这样的话使用Win自带的RemoteDesktop就可以连接Ubuntu的Unity了。
下面把步骤写下~
OK!搞定!就这三步就可以实现XRDP连接Ubuntu Unity。怎样?简单吧?
不过这个方法也是bug的,目前已知的bug是:
参考URL:http://c-nergy.be/blog/?p=9962
2020-05-28 更新
这个方法感觉还是麻烦了些,而且还有BUG导致Logout菜单等等看不见。最好的办法还是用Mate桌面,相关代码如下:
sudo apt-get install xrdp

sudo apt-get update

sudo apt-get install mate-core mate-desktop-environment mate-notification-daemon

sudo sed -i.bak '/fi/a #xrdp multiple users configuration \n mate-session \n' /etc/xrdp/startwm.sh
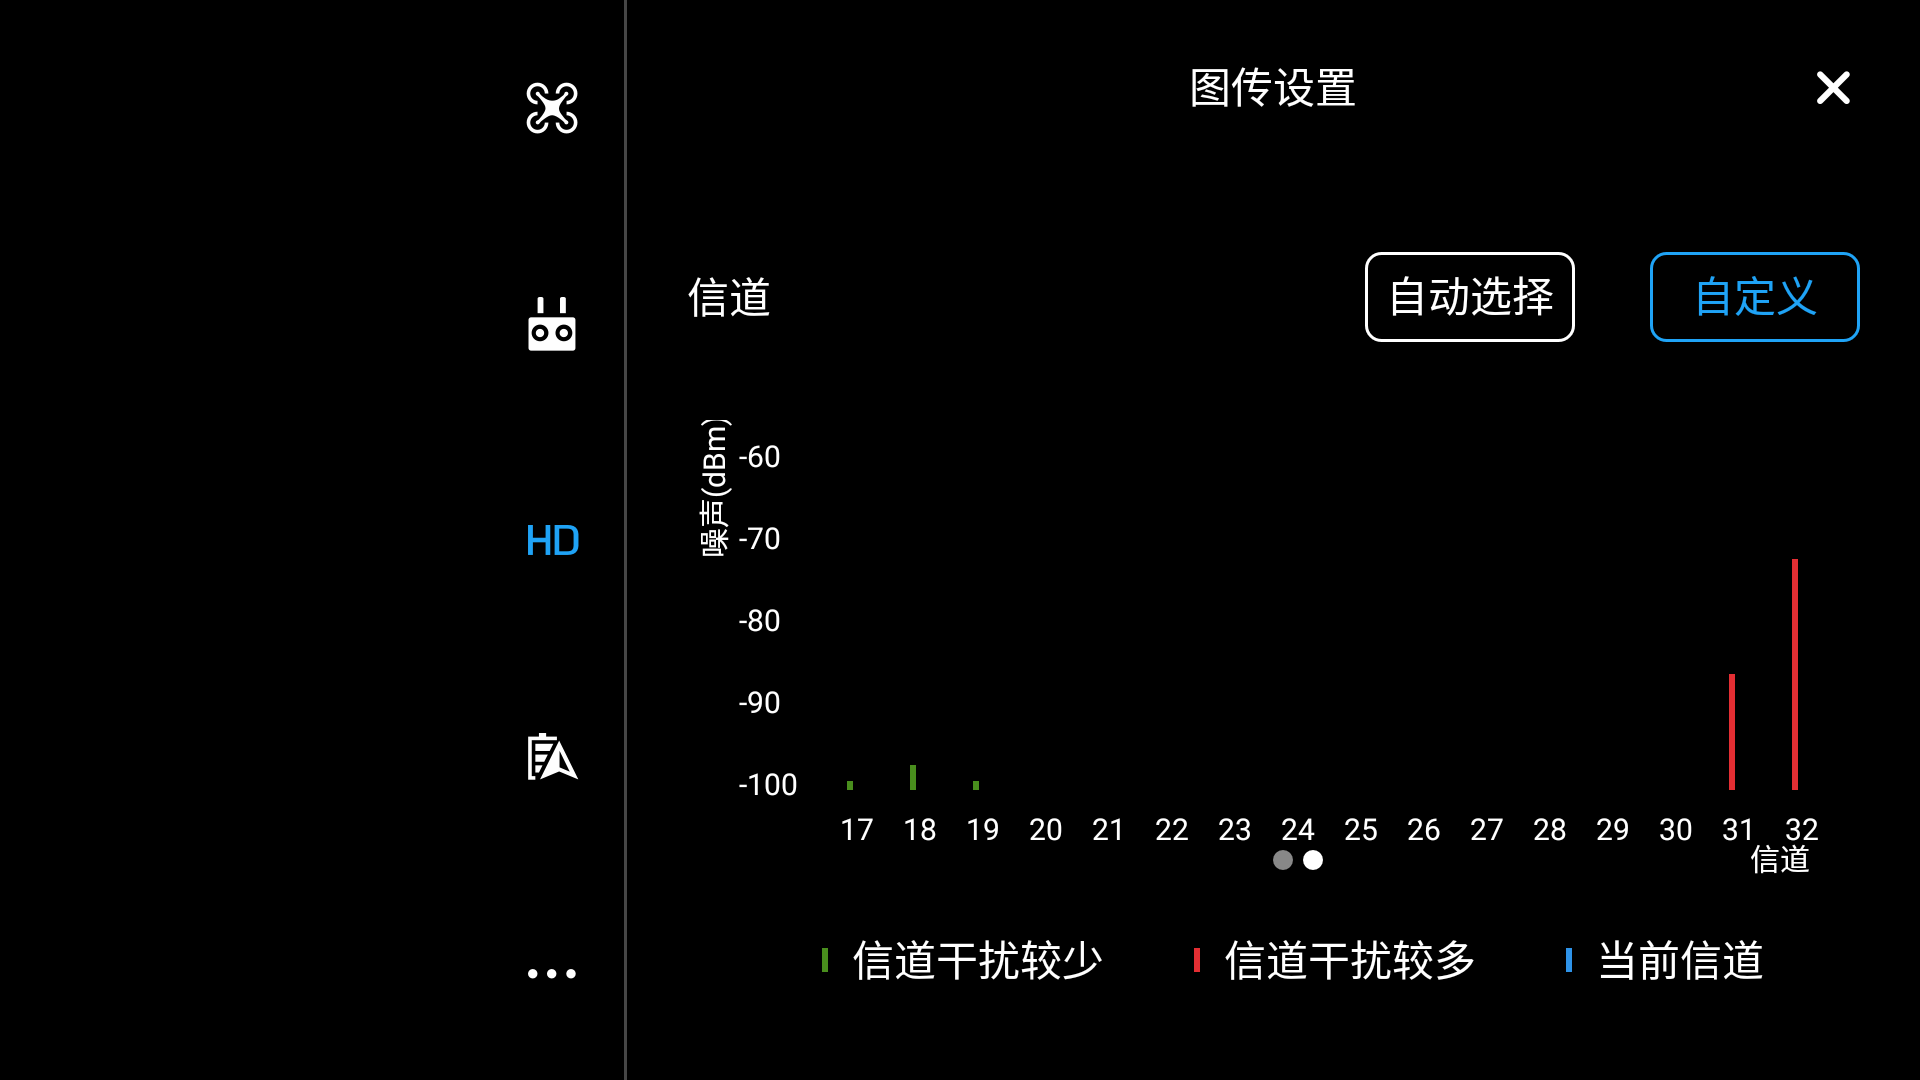
sudo ufw allow 3389/tcp大疆精灵3和大疆悟的图传都只有8个默认通道,有时候会因为受到外界干扰飞行的时候图传中断,是个很蛋疼的事情。可能有些模友还不知道,其实Phantom3的图传通道还是可以破解的,inspire 1理论上也可行,因为图传用的是同一套方案。
破解方法非常简单,安卓就是把附件里面的这个.DJI.configs文件释放到 \Android\data\dji.pilot\files
iOS的话就是直接把这个.DJI.configs文件放到APP目录下面。
搞定以后打开DJI GO,就会发现图传已经可以选择32通道了。但是注意只能选手动指定通道,不能选择自动。
破解32信道以后,只要有遥控信号的时候,图传就不会消失。不然有些地方干扰大了,会造成图传卡顿,或者消失,但遥控信号依然受控。
下载:32channel
已经可以Ping通Google.com或者Google.com.hk了。但是怎么还是不能打开? 原来是跳回到http了。
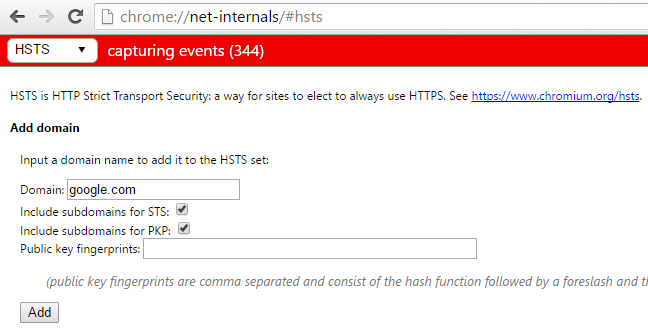
要强制https的话,以Chrome为例。可以打开 chrome://net-internals/#hsts
在 Domain 栏里,输入 google.com或者google.com.hk,并勾选下面的两个复选框,点击 “Add” 按钮即可。
强制 Google 网页快照使用 HTTPS,输入 googleusercontent.com。
强制 Google APIs 使用 HTTPS,输入 googleapis.com。
当然如果你嫌这个操作比较繁琐的话,可以安装插件HTTPS Everywhere。